
By their very nature, digital prints can sometimes seem sterile and/or products of a mechanized age vs. the handmade traditional prints of yesteryear. It wasn't too long ago that a fine, one-of-a-kind print was strictly produced by an artisan with practiced skills and an experienced eye developed from years of hands-on study and perfection of the craft.
 Hand tearing a piece of EntradaThe art of making prints is changing and although it still can be said that the art of printing is just that, an art perfected by only a few, the human element can often be void from a fine print produced digitally. The easy misconception for many viewers and buyers is that it simply requires a push of a button to create and reproduce a masterpiece. In a society of immediate gratification, the perceived value of a digital print has evaporated without the clear evidence of the human touch.
Reintroducing small unreproducible or at least non-mechanized embellishments to a print is a great way to remind the viewer of the artisan behind the print. This technique works best with cotton papers which are reminiscent of the most traditional forms of printmaking. It's also important to remember that adding anything to a print should be done carefully to add value to the print, not distract from the image. With that in mind, one of my favorite things to do is to hand tear the edges of a print. This looks great once float mounted but is also a great method to use for books and cards as well. Hand tearing or deckling helps visually provide evidence of the human touch and ensures that each and every print is unique and creates value.
The technique for hand-tearing is easy to learn and fun to do. It requires no specially acquired tools to try and there is no right or wrong way to do it. Each tear is unique and variation can be achieved through simple changes in pressure and speed of the tear. Follow the steps below to get started, but experiment with your own methods as well. Practice on scraps and unprinted sheets first until you're comfortable doing the real thing. Now that you've got the basics you can add value to your prints and make each and every one a truly singular piece of art which your hands had a part in creating.
CHOOSE THE RIGHT PAPER
The best papers for the task are long-fiber papers like cotton. I recommend using Entrada Rag Bright or Natural 300 gsm though the lighter weights work too and are best for books and cards.
USE SIMPLE TOOLS
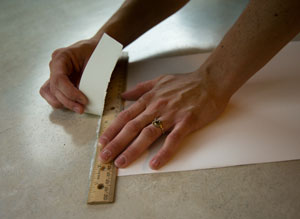
There is a tendency in the digital age to want to use special tools for everything, the latest printer, inks, camera, memory, computer, and the list goes on. This is one of those rare occasions for low tech rules the day. Simply use a good ruler or other straight edge. I prefer a wood ruler with a metal edge as this allows me to get a specific result, but literally any good straight edge works. I've used a credit card as an on the fly demo. Bottom line, use what you have.
TEAR THE PAPER WITH PURPOSE
Place the ruler at least 1" from the edge of the print and firmly hold it in place. With your free hand, grasp the paper and gently begin pulling the paper up and towards the ruler. The faster you tear, the less variation the tear will have, the slower and shorter the tears the more. A little practice and you'll discover what you like the best. There is no wrong way. Develop something that works for you.