Subtotal: $0.00 Cart

  • the source of our inspiration


    premium, archival fine art inkjet papers wrapped in the intimacy of a rural culture

    @Jenniferking_photographer
  • Free MOAB classes


    videos and livestreams released weekly

  • juniper baryta rag


    our best reviewed and most award-winning paper yet

Desert Varnish Spray

How to Protect Your Inkjet Prints

Moab Master, Les Picker, demonstrates how to use Moab Desert Varnish to protect your inkjet prints from scuffing, scratches and fingerprints.

The spray is 100% invisible and has no sheen whatsoever. There are sprays on the market that do this, but we decided it was better to leave the visible look of the print as-is.

When should you use it?

You can technically spray a print within 15 minutes after the print comes out of the printer, however I would wait a day. Pigment inks have a glycol that needs to evaporate 100%, and 99% of it is gone within a few minutes of printing. It is that last 1% that I would like to be sure about. The spray dries very very quickly, like 20 minutes. I would print, let sit for a day, spray, package up later that day. That means one day after your print is printed.

Are All Print Fixative Sprays Created Equal?

BV5A7000 1.jpg

Author: L. Picker

04 Nov 2020

If you’ve not downloaded your free copy of the comprehensive guide to fine art printing with Lightroom, get it now!

We’re often asked by photographers who print whether they should fixative spray their fine art prints and, if so, what spray to use. Admittedly, this is somewhat of a loaded question and requires some background to answer fully. If you follow the path I’ll lay out here, I think you’ll come to a good understanding and a choice that will work for you.

Background First

I’ll set the stage by addressing a follow-up question to “Should I spray my prints?” That is, “Should I spray my glossy prints as well as my matte prints?”

The general rule of thumb is that if you are not placing your matte paper print behind UV glass, then it should be sprayed with a quality varnish. That is not the case with glossy or semi-gloss papers, as you’ll see.

The resin coatings on glossy papers are very sensitive to varnishes and will invariably lose some of their gloss when sprayed, no matter the quality of the spray. Our tests over the years have reinforced that. However, we’ve heard of situations where photographers have intentionally sprayed their glossy prints to achieve the level of glossiness they prefer. This would take a lot of practice.

Further, if you plan to hang a glossy print not behind glass, in a room exposed to sunlight, wether direct or indirect, the print will degrade over time, often in a matter of months.

So, while we included glossy papers in our test, the findings that any varnish will degrade the glossiness is no surprise. We just wanted to address the question of whether all papers should be sprayed.

Our Research

Since print sprays are such a frequent question, and to satisfy our own curiosity and ability to advise our readers, we began several years ago to carefully research the issue. We make several hundred fine art prints each year in our studio. Over the years we have purchased many different sprays and tested them on a variety of papers.

The fact is that not all print sprays are created equal. Ingredients and relative percentages of them in the formulation vary. Spray patterns and particle size varies. Different sprays can create very different effects on identical prints.

It’s important to understand that while we’ve tested several different brands, we have not tested all, so we can’t categorically say that a certain price range or list of ingredients is better than others. What we can and do recommend is that you try sprays on some test prints and carefully determine for yourself what works.

One bit of consumer advice is this: you stand a better chance of buying a quality varnish if it is sold under the brand name of a major, respected paper company. They have a stake in the game of ensuring you will get the best prints possible. If the paper company does not sell a self-branded spray, but recommends a third-party brand, stick to that recommendation.

Method

Obviously we can’t reproduce for you all the research we have done over the years. Instead, we recently tested a typical Brand X spray that is heavily advertised online and compared it with Moab Desert Spray. I won’t reveal the name of the Brand X spray, but I assure you it is typical of many others in that category that we tested.

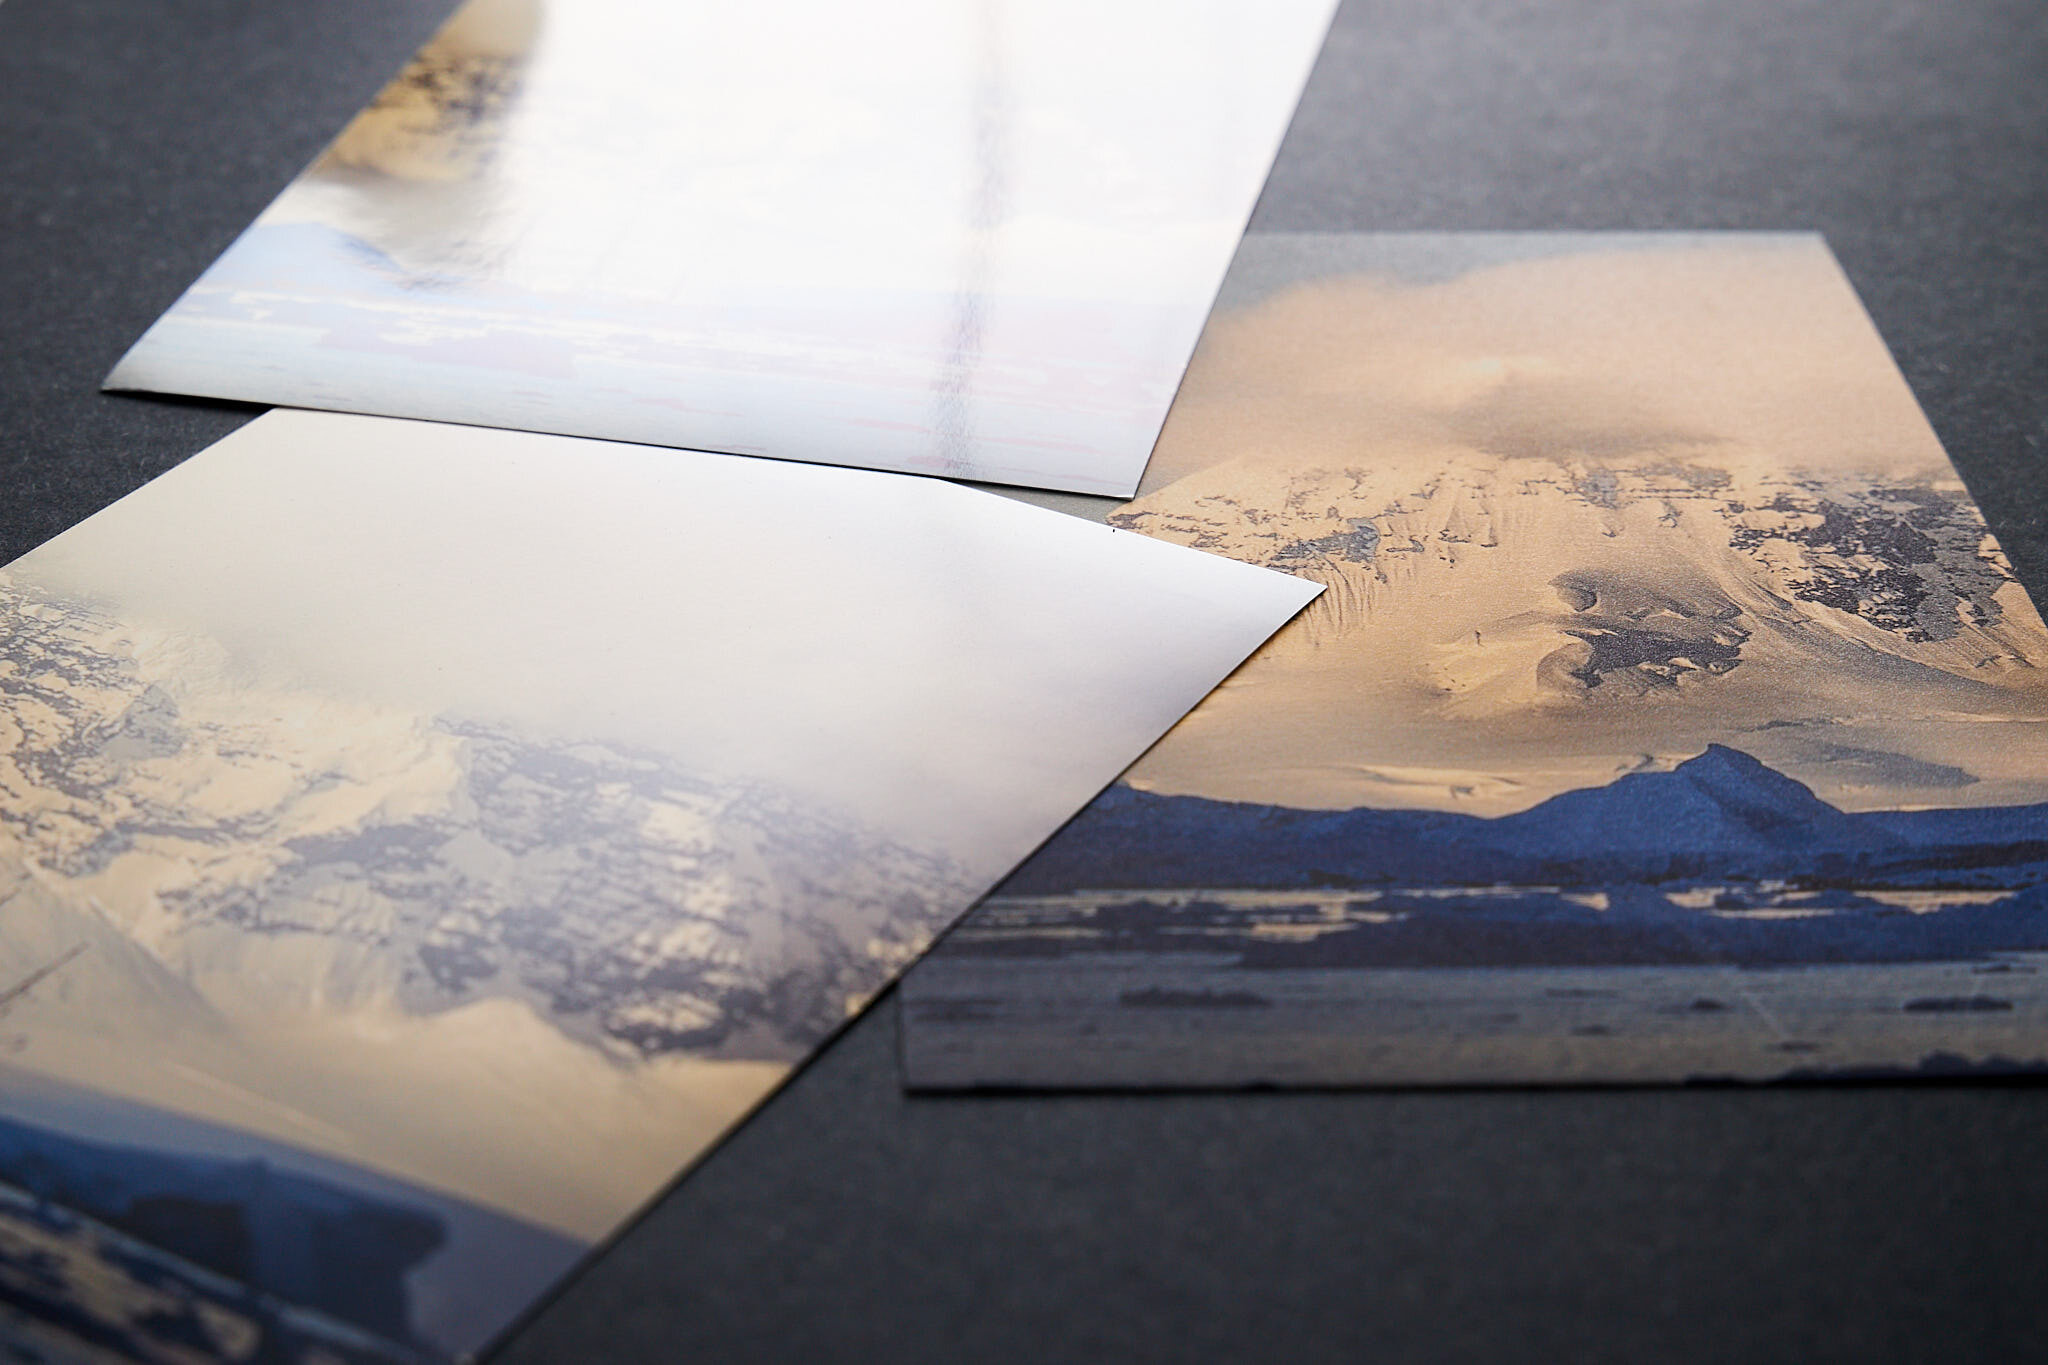
We printed the same image on Moab Entrada Natural (a matte paper), Juniper Baryta Rag (a satin/semi-gloss paper) and Moab Slickrock Pearl (a super glossy paper). We then cut the images in half (to save paper).

We then sprayed one set of all three papers with Moab Desert Spray, and another set with Brand X. A control set was left unsprayed.

Each of the sprayed prints received two full coats, as recommended by the manufacturers. It should be noted that Brand X recommended more than two coats, but when we tried that the negative effects we documented (see below) were more pronounced, so we standardized on two coats.

The Evidence

Note: Demonstrating spray effects on a print using an image on a monitor is challenging and the following images do not fully show the differences I mention below.

Our setup was simple; three rows of three prints. One was the control set, another was the Moab Desert Spray and the third was Brand X spray.

Moab Desert Spray vs Control.

Matte paper. Moab Desert Spray does an excellent job on the matte paper, preserving the blacks very well. It is invisible on the matte paper, with no haze or color cast. In our own studio we typically spray two coats of Desert Spray on our matte prints, unless they will soon be framed behind UV glass.

Satin/Semi-gloss paper. The same can be said for the satin/semi-gloss paper. Blacks are preserved but, as expected, there is a very slight dulling effect on the semi-gloss coating. However, when we showed the sprayed print to professional photographers they did not notice the dulling, until they placed it side-by-side with the control print.

High gloss paper. With the high gloss print there is an obvious dulling effect, although some observers might still rate it in the acceptable range. In effect spraying a very glossy print turns it into a semi-gloss print at best.

Brand X vs Control. In this set we compared Brand X spray with the controls.

Matte paper. We can immediately see the effect this spray has on the blacks, reducing the D-Max and trending them toward a noticeable washed-out appearance. There is also a visible, distracting mottled coating that is apparent on closer inspection.

Satin/Semi-gloss paper. Now the effects of Brand X are quite apparent. The glossiness is eliminated, blacks are muted, and there is a distinct objectionable rough and whitish mottled coating on the print that you can feel when you run a finger over it.

High gloss paper. As they say, fuggedaboudit! The print is completely ruined. The glossy coating is gone, blacks are subdued and a nasty white coating covers the print. Unfortunately, Brand-X turns everything into an ugly, low D-max matte print. You can see the effect close-up in the B&W description below.

BV5A7023.jpg

Black & White paper. For this test we used a heavy GSM matte paper. We sprayed one with Brand X and the other with Moab Desert Spray. Laying the two prints side by side we were stunned. Brand X again deposited a noticeable whitish layer on the print and reduced the contrast in the blacks and shadows, making them muddy and rendering the print unusable. You can actually feel that rough deposit as you run your finger over the print. (Please note that the Moab Desert Spray print was intentionally made as a toned print. We used available test prints that we keep for research purposes).

BV5A7121.jpg

Moab Desert Spray vs Brand X. Here is a quick summary of our findings:

  1. Moab Desert Spray projects a very fine, even mist with no spitting. Brand X has a coarser spray and periodically spits a glob of fixative, which spells the death of a print.

  2. Moab Desert Spray is slightly more expensive than some other brands but is not the most expensive on the market. Even some poorly performing brands are higher priced, so comparison shop.

  3. Both sprays have an expected effect on glossy papers, although the Moab Desert Spray result may still be acceptable while Brand X renders the print unusable.

We did not test for hardness (ability to prevent scratches) nor did we test for cost per print. However, if one compares the manufacturers’ recommendations, you would need more coats of Brand X for maximum effectiveness, thereby raising its price per print. We suggest reading the label before purchasing.

Lessons Learned

Here are some lessons to be learned about using fixative sprays:

They do protect. Fixative sprays do offer a degree of UV protection which is a real plus since UV light can degrade a print rather quickly. We regularly put two or three full coats on our matte paper prints if they will not be displayed behind UV glass. Sprays are also reported to add a bit of scratch protection, but we do not have the equipment to test that claim. However, the spray appears to protect against fingerprints, which is merely our anecdotal observation based on heavily handled prints in our studio.

Allow print to dry. Before you spray, allow the print to fully outgas for 24 hours.

Use proper technique. Make sure to use correct technique when spraying your prints. First, obsessively dust the print. Stay the recommended distance from the print, move your arm steadily across the print surface without bending your wrist. Start your spray off the print and end it off the print. One coat means spraying horizontally and then vertically, making sure to allow the recommended amount time between coats (usually 4-5 minutes). Always spray with your print hanging vertically. Spraying while the print is laying flat on a table can be disastrous if you get any “spitting” from the spray nozzle or if your technique is not good. Drips, runs and spit marks are permanent and will ruin the print. Wear a respirator and spray in a well ventilated area. Adhere to the room temperature recommendations of the manufacturer.

Discount the Internet. Be wary of Internet chatter on the topic. A lot of the product “reviews” are by shills that the manufacturer hires. Others are by photographers who have limited printing experience, have not tested sprays, and/or have not seen the differences between brands. Instead rely on the recommendations of experienced printers. Ask people in your photography club or email photographers whose work you admire, whose prints sell and who have excellent reviews from collectors. Some framing shops offer spray services to customers and can offer advice. However, be forewarned to have an exact duplicate print so you can compare the control print to what the framer has done. It’s easy to be fooled if you do not have a comparison print.

Test for yourself. Try different sprays and try them under different environmental conditions you will experience. For example, we have found that some sprays have radically different results at lower temperatures. Test sprays for every paper you plan to protect, until you find one (or two) you prefer.

You get what you pay for. Brands that sell for half the price of reputable brands do so for a reason. After spending so much time getting to a perfect print, do you really want to risk it by saving a few dollars?

Sprays are not formulated for high gloss papers. As mentioned above and as you can see from the images, glossy papers suffer from fixative sprays. The additives in glossy paper are sensitive to the chemicals in the fixative sprays and will lose some of the gloss when sprayed. Even semi-gloss/satin papers will be affected. In general, the glossier the paper, the more the spray will affect it, irrespective of brand.

Skip if behind glass. There is no need to spray a print that will be framed behind UV glass. UV glass is more expensive, but it offers more protection from UV rays and is often available with anti-glare properties.

Making Your Own Floating Frames

by Les Picker

In our small-group, intensive fine art print workshops, I get asked a lot about framing options. My associate and I are believers in traditional framing, both for its elegance and for the fact that it enhances and does not compete with the image itself. We prefer our traditional prints to be set in matte black frames with white double- or triple-mats (such as Rising Museum Boards). Art collectors and our most discerning clients typically choose this option.

Enter Canvas Prints

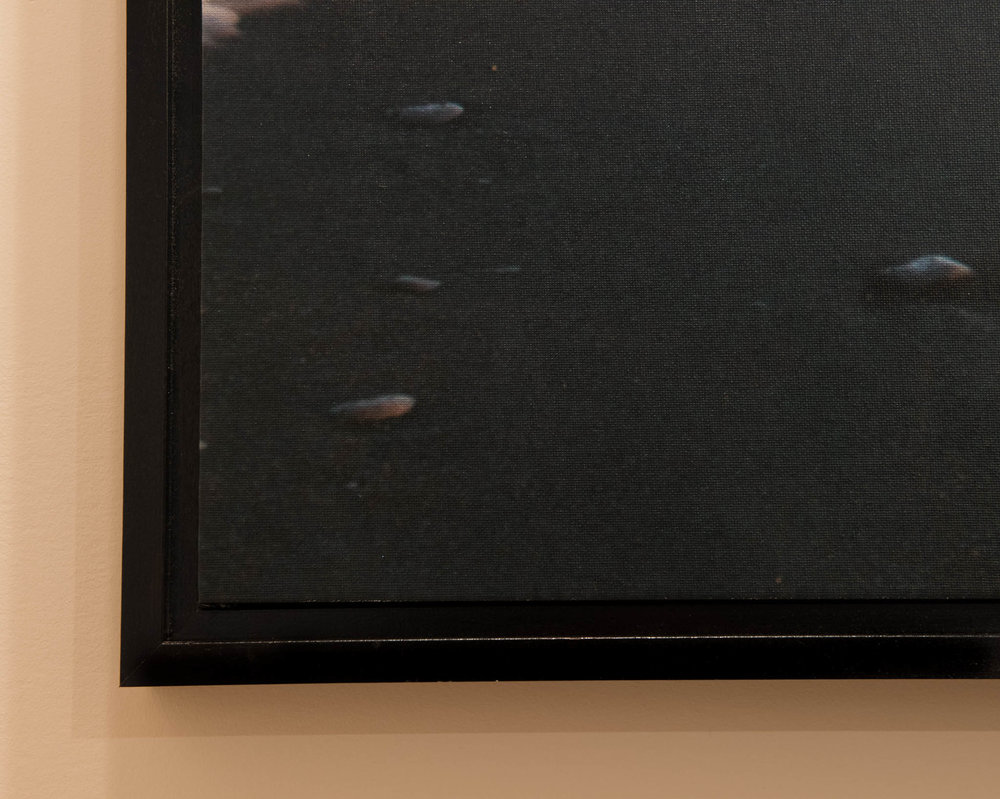
But, what about canvas prints? This print option has become highly popular, both for its cost benefit for consumers as well as its wide range of display options. Of course, there is always the standard canvas display option of wrapping the print over wood braces and hanging it as a clean, simple work of art, and we do occasionally sell canvas images with that treatment. However, a few years ago we began offering our clients a framed canvas option which is generally known as a "floating frame" or "open frame".

There are many variations on the floating frame theme, but I’d like to offer those of you new to the game an idea of how to construct floating frames yourself easily and inexpensively. Once you get the hang of it, you’ll find yourself developing spinoffs unique to your photography. In fact, we now offer several floating frame options, including one for traditional fine art paper prints.  Their less formal presentation is appealing to some clients.

Open frames refer to the fact that the image is not enclosed in glass or Plexiglas. Open frames also typically include a "gutter" between the canvas (or print) and the frame edge. When we first offered this open frame option, we were charged around $300 and up for a 30" x 40" frame. Now we make our own open frames in-shop for under $75, not including labor. However, once you get some experience, it should not take more than an hour or two to create a floating frame. The rest of this article is a how-to, illustrating how we create these open frames.

Stick It To Me

The key to holding down expenses is to order the framing pieces in bulk. These frame "sticks" are available from a variety of vendors and in different lengths. A careful Internet search will show you vendors near you so that you can save even more on shipping charges.

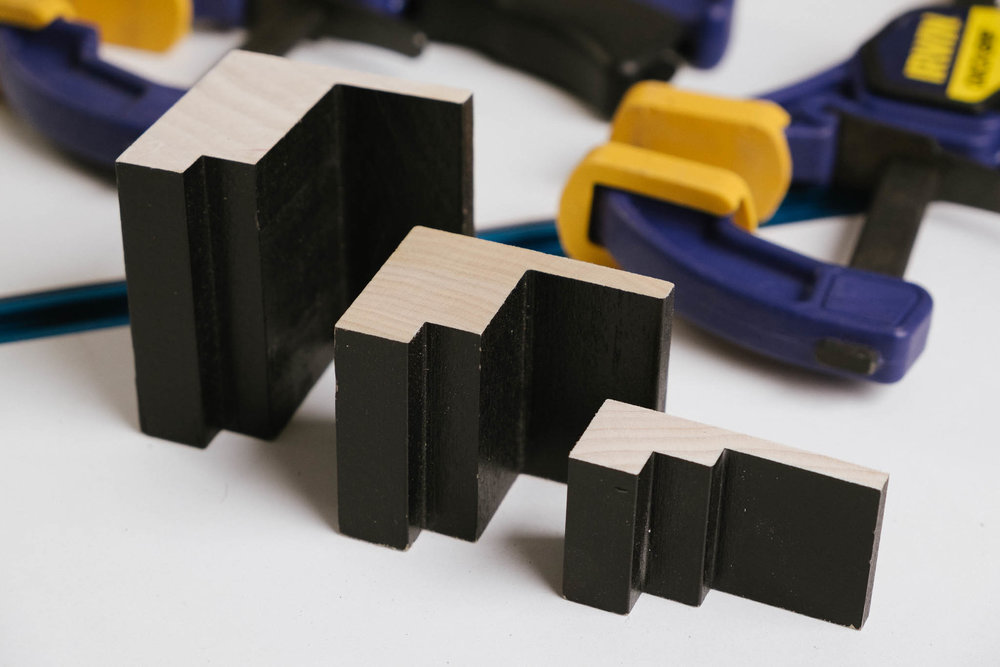
We generally buy three stick sizes corresponding to the thickness of the canvas wraps, namely .75, 1.25 and 1.75 inches. Smaller canvases would get the .75" open frames, while larger pieces get the 1.75" frames. I typically order several hundred feet at a time of mixed sizes in ten-foot lengths.

Floating frame sticks are different from standard framing sticks that you would use for prints behind glass. They do not have an inner lip to hold the glass (see ILLUSTRATION #1). They are also typically free of adornments on the frame edge facing the viewer.

Illustration #1

Also, floating frame sticks do not have a completely open back, like traditional framing sticks. Instead they include a wide "platform" that is needed for the back of the canvas frame to rest against and adhere to, whether with glue or screws.

Measure Twice… Cut Once 

The old carpenter’s maxim - measure twice and cut once - applies here. I’ll assume that you have already wrapped your canvas over a suitable frame. Depending on the thickness of the frame (.75”, 1.25" or 1.75"), assemble the appropriate thickness framing sticks. If the sticks are not painted, now is the time to do that.

I prefer to use a primer spray as a first coat, and then spray on two light coats of flat black paint. With the proper setup, this process should take 10-15 minutes for each coat for a frame that is 30" x 40". Depending on the specific brand, most paints need several hours between coats, so I sandwich the job between other chores. Be sure to wear gloves, eye protection and a breathing mask.

Once your sticks are completely dry (allow 24 hours), carefully measure the length and width of your wrapped canvas, not the dimensions of the original wood frame that the canvas is wrapped around. That is so that you incorporate that little bit extra material that is required due to the thickness of the canvas wrap itself. You want to ensure a snug fit.

For simplicity purposes, let’s assume that you have a 24" x 36" finished piece, canvas wrap included (you should first coat the canvas with a protectant). This means you will need two sticks at 24" length and two at 36" - to the **inside** dimension (see ILLUSTRATION #2). You will need to cut the pieces to allow for the 45-degree miter corner cuts to extend out from your measurements. Please note that the open frame sticks have three levels to them. The wrapped canvas will rest on the flat backing platform. So you want the inside dimensions to be measured at the second step, as indicated by the arrow in illustration #2.

 Illustration #2

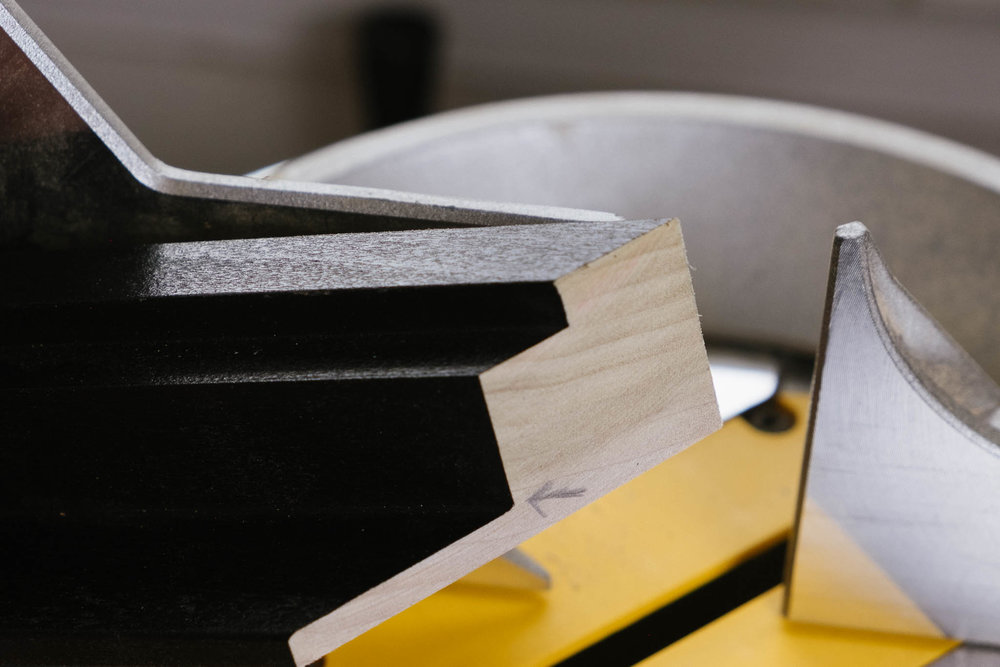
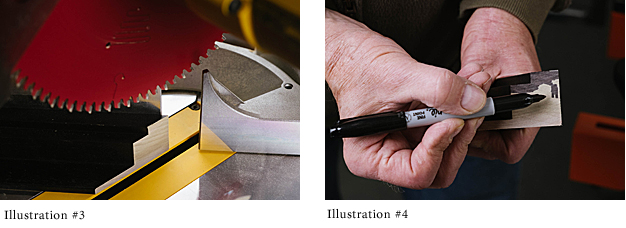
Using an electric or hand miter saw, carefully cut the first miter at 45 degrees, making sure that the sticks are oriented properly (see ILLUSTRATION #3). Once that is done, remeasure the stick to get an exact measurement to the **inside** of the miter on the opposite end of the stick so that it equals precisely 24" or 36". This ensures that your mitered corners will be exact.  If you are using an electric miter saw, I recommend using an 80-tooth blade for clean cuts. With a hand miter saw, use one with as fine teeth as possible. Sand lightly as needed. With all the miters done, you are ready to begin assembly.

Assembling the Frame

Before you start permanently assembling the frame, first take some of that black paint (or whatever color you painted the sticks) and dab some about 1/4 inch in along each mitered corner (see ILLUSTRATION #4). This will prevent any unpainted edges from showing if your frame is a bit off a perfect 45-degree angle. You can even use a black permanent marker, as shown here, but in that case use two coats.

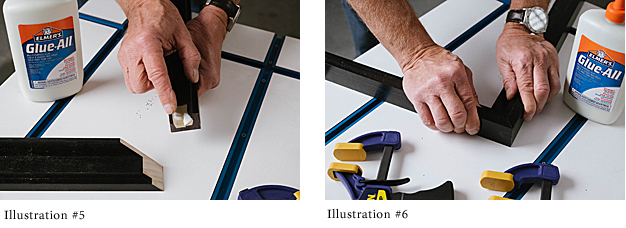
Once the frame is completely dry, spread a thin layer of wood glue on each mitered corner and fit the pieces together loosely to ensure that the fit is good (see ILLUSTRATIONS # 5 and 6). Wipe off any excess immediately.

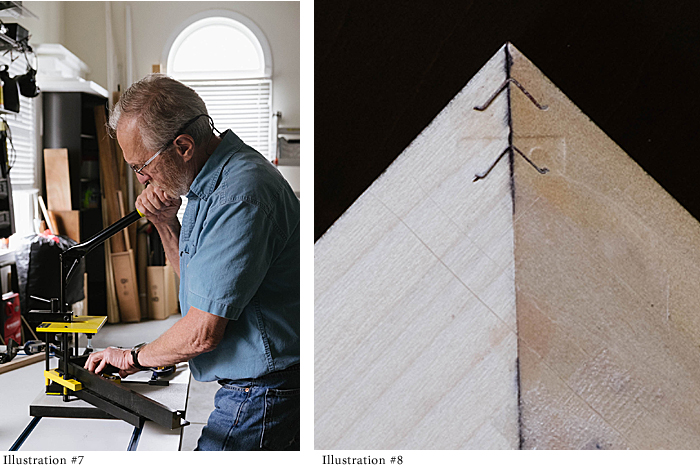
There are alternate ways to actually fasten the pieces together permanently. Our preferred method is to use a simple hand-operated machine available from many suppliers. This machine holds two corners tightly together to create a perfect joint. While they are being held in place by the machine, you pull down on a handle, which forces a corrugated metal wedge into the back side of the frame (see ILLUSTRATION #7 and 8). That wedge keeps the corners tight. When the glue dries you will have a joint that is more permanent than the wood itself.

There are times when we use glue and a nail gun to permanently adhere the corners, especially with smaller pieces. In any case, pick a method you like and stick with it until you become thoroughly familiar with it.

Other Uses For Floating Frames

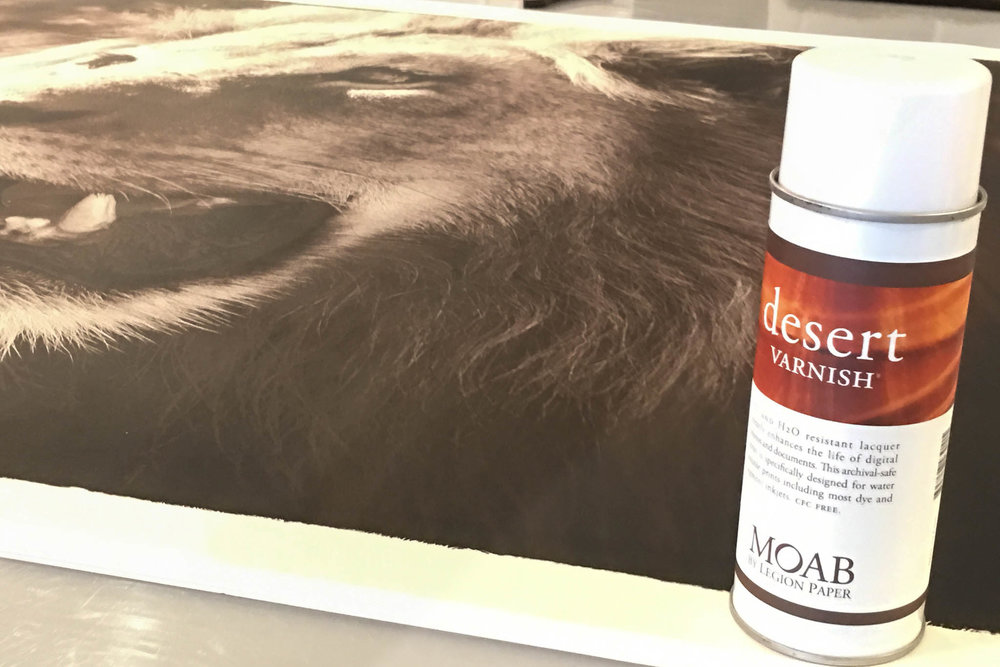
Illustration Elephant 1Floating frames can also be used with traditional fine art paper. This open-faced display is increasingly popular (see ILLUSTRATION-ELEPHANT-1). In this case the print is first mounted on rigid Gatorboard and the entire board mounted on the frame with glue. One word of caution: make sure to first double spray the print with Moab Desert Varnish or equivalent, since the print is exposed directly to air and fingerprints (see ILLUSTRATION #9).  That double coating also gives some degree of UV protection. We love this presentation with a textured paper, such as the Moab Moenkopi line.Illustration #9

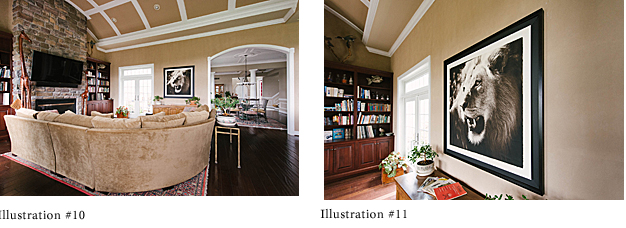
We have also developed an enlarged version of the open frame for areas where a super-large print is desired. We simply enlarge the border by using flat black mat board, as in the image of the Kalahari lion I photographed in South Africa (ILLUSTRATION # 10 and 11).

Finesse and Display

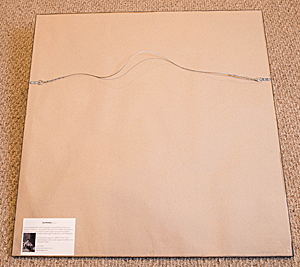
We like to finesse the final product by covering the back of the frame with a thick brown paper. We cut the paper 1/8" short on each side and then glue it to the frame. That gives the back a clean, professional look (see ILLUSTRATION #12) and protects against dust and insect damage. 

Once the entire presentation dries, you can insert metal eye hooks and wire to the frame for hanging (see ILLUSTRATION #12). I prefer to pre-drill the holes for the hooks to prevent splitting.

Our clients love the open frame display option, particularly young people just beginning to invest in fine art photographic prints. 

Why not give this display option a try? I think you’ll be pleased with the results, as will those viewing your artwork.


About the Author

Les Picker is a professional photographer with credits in National Geographic publications and dozens of others. He is a Moab Master and was awarded the prestigious Canada Northern Lights Award for Best Travel Photography. Les offers photo tours throughout the world. His fine art print workshops are sponsored by Moab