This article was written by Moab Master, Joshua Holko
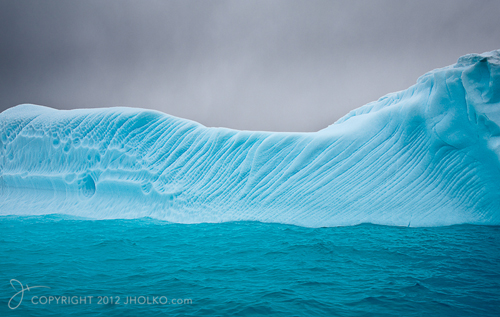
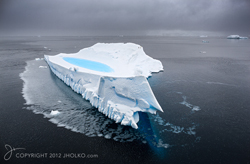
One of the most exciting and enjoyable aspects of a photographic trip to Antarctica is the opportunity to climb into a zodiac with like-minded photographers and spend countless hours cruising amongst the spectacular icebergs and glaciers that line the Antarctic Peninsula. For the photographer with a penchant for icy landscapes it just doesn’t get any better, and the opportunities are virtually limitless.
Cruising in a zodiac is one of the best ways to photograph icebergs since it puts the photographer at sea level, enabling wonderful perspective opportunities that are impossible to achieve aboard a large ship. Zodiac photography also provides you with the opportunity to get very close to even relatively large icebergs, thus enabling you to create dramatic photographs through the use of wide and ultra-wide angle lenses. If your zodiac driver is keen and fearless enough then in many cases you can even get close enough to touch some of the more stable icebergs (as I did on several occasions). If you are super keen then you may even be up for a polar plunge, as one member of my group recounted from a previous expedition.
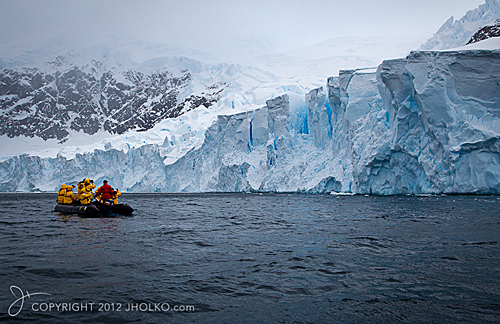
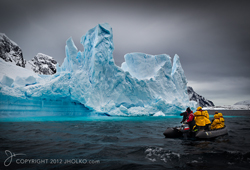 During my last Antarctica trip I spent over twelve hours cruising in zodiacs with other photographers, which provided ample opportunity to not only photograph icebergs, glaciers and penguins, but also to place other zodiacs and people in the frame to provide a sense of scale and context to some of the photographs. I normally work very hard to exclude the hand of man in my landscape photography, but in several instances it provided the perfect counter point to complete and balance the frame.
Whilst the idea of wrestling with camera gear in a pitching zodiac on Antarctic seas with ten other photographers all jostling for position might sound like less than ideal shooting conditions, the reality is quite different. A zodiac provides a relatively stable shooting platform and can actually comfortably accommodate up to ten photographers (with equipment), a dedicated driver, and still provide ample room for everyone to shoot simultaneously. I never felt cramped or uncomfortable and was successfully able to share the space available with those around me. Usually those on the side closest to the subject kneel on the floor of the zodiac with their arms resting on the pontoon. 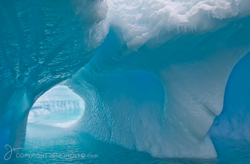 This provides a very stable platform for handheld shooting. Photographers on the far side of the subject can then stand and shoot over the top of those kneeling in front of them. The zodiac driver would always do a few passes, thus enabling everyone to get the shot from several vantage points. Because a zodiac is a small boat and is constantly moving, it is important to keep shooting whenever the subject is in frame since the composition is constantly changing. There is very little time to properly compose a well-considered frame before the angle of view has changed. Instead, the challenge becomes one of selective editing later on.
Photography from zodiacs does require some additional and necessary equipment, including thermal clothes, waterproof jacket and pants, self inflating life jacket, and rain covers for camera equipment. One of the biggest challenges is protecting camera equipment from salt spray, sleet and snow. During several of my zodiac sessions we were buffeted by high winds whipping up spray as the zodiac moved through the sea. We also experienced heavy snow, driving rain and sleet. During several trips I had my camera equipment completely soaked and was very glad of the weather sealing of my 1-series Canon cameras, which operated flawlessly. Several Canon 5D MKII cameras were not so fortunate and succumbed (albeit temporarily) to the harsh, wet conditions. I recommend carrying at least one cloth suitable for drying the front element of your camera lens and a separate bag in which to keep it dry.
In terms of positioning I found it generally best to sit toward the back of the zodiac to avoid the worst of the salt spray that is inevitably thrown up at the front of the boat. However, there is no free lunch at the rear either, where the fumes of the outboard engine’s exhaust can become somewhat nauseating after a period of time and gave me a headache on more than one occasion.
 The choice of lens when shooting from zodiacs is an important consideration in your planning since it is quite difficult to swap lenses without ending up with a camera full of salt spray, rain or snow. In fact, even swapping out small SD memory cards can be a challenge in a pitching zodiac whilst wearing cold weather gloves. On top of this, Antarctica is an incredibly dusty environment and it is a good idea to try and minimize lens changes, or at the very least find a sheltered place to do so. I chose to shoot with both my 1DS MK3 and 1DMKV cameras, as I wanted to utilize prime lenses for the majority of my shooting and dual camera bodies gave me an additional focal length option without having to change lenses. I primarily shot with the 24mm F1.4L MKII and 17mm F4L TSE and occasionally with the 70-200mm F2.8L IS. I am comfortable shooting with prime lenses at the wide end and found these two lenses excellent for the task. Most photographers chose to shoot with zoom lenses when on zodiac excursions since they provide for increased framing possibilities. A zoom lens such as a Canon’s 16-35mm or Nikons 14-24mm will provide for more flexible framing.
A few tips if you are planning your first photography foray on a zodiac in Antarctica.
- Be sure to visit the bathroom before you climb on board. It’s amazing how the call of nature can hit you when you are in the middle of the Antarctic Ocean on a boat full of photographers keen on anything but heading back to the ship so you can relieve your problem.
- Don’t forget to put on your life jacket before you queue up to board. It’s amazing how difficult it can be to put on a life jacket over bulky thermals and wet weather gear whilst in a narrow ship corridor and juggling cameras.
- Carry a couple of dry lens clothes in an easily accessed waterproof bag for drying the front element of your lens. Use rain covers to protect your cameras.
- Carry spare camera batteries and spare memory cards in an easily accessed waterproof pocket. There is nothing more frustrating than being on a zodiac with a flat battery or full memory card.
- Wear sunscreen. Even in overcast conditions the reflected UV light off the icebergs will cook you in a very short space of time. The ozone layer is very thin over Antarctica.
- Wear plenty of warm clothes. Sitting on a zodiac, it is very easy to become chilled to the bone if the weather is poor or the wind is up. It is easy to remove a layer if you get too hot.
- Be considerate of those around you before you stand up or lean in front of someone else. Space is limited on a zodiac and everyone wants to take great photographs.
- Zodiac drivers are often keen photographers themselves and will do their best to put the zodiac in the best possible position for shooting. If you need to get closer or further away you can ask, and I have found they are usually very accommodating.
- Never carry loose pieces of paper or plastic. Antarctica is a pristine environment and it would be very easy to lose these items to the wind.
- Above all else, have fun. Shooting from zodiacs is an incredible experience and it’s important to put the camera down occasionally, have the driver switch the engine off and just appreciate the silence, rugged and raw beauty of Antarctica.
Andy Biggs and Joshua will be announcing a new expedition to Antarctica in late 2013 in the coming months. If you would like to register your interest to be one of the first to be notified when the trip is announced you can email either Andy or Joshua at info@andybiggs.com or jholko@bigpond.com